
If you’ve been feeding your sourdough starter and wondering what to do with all that discard, this sourdough discard focaccia is your answer. It’s golden, crispy on the edges, pillowy in the middle, and drizzled with good olive oil. No long ferments, no stress — just a simple, delicious flatbread that uses up that jar of discard sitting in your fridge.
Why You’ll Love This Sourdough Discard Focaccia Recipe

This recipe solves a real problem: sourdough discard often gets tossed, but it’s packed with flavor. This focaccia puts it to work in the best possible way.
- Uses up discard immediately — no need for an active, bubbly starter.
- Faster than traditional focaccia — commercial yeast does the heavy lifting.
- Incredibly versatile — eat it plain, use it as sandwich bread, or serve it as a side.
- Beginner-friendly — no special equipment needed, just a bowl and a baking pan.
What Makes This Recipe Special
Most focaccia recipes skip the sourdough entirely. Adding discard here gives the bread a subtle tang and a more complex flavor — something that plain focaccia just doesn’t have. The discard also contributes to a slightly chewier, more interesting crumb.


The other secret? Generous olive oil. Don’t be shy. That’s what creates the signature crispy, almost fried bottom crust that makes focaccia so addictive.
Ingredients You’ll Need
You likely have most of these on hand already. The key players are your sourdough discard, good olive oil, and a bit of patience while it rises. Use the best olive oil you can afford — it genuinely makes a difference here.
- Sourdough discard — unfed, straight from the fridge works fine.
- All-purpose or bread flour — bread flour gives a chewier result.
- Instant yeast — ensures a reliable, consistent rise regardless of discard activity.
- Olive oil — used in the dough, the pan, and drizzled on top.
- Flaky sea salt — the finishing touch; don’t skip it.
Pro-Tips for Success
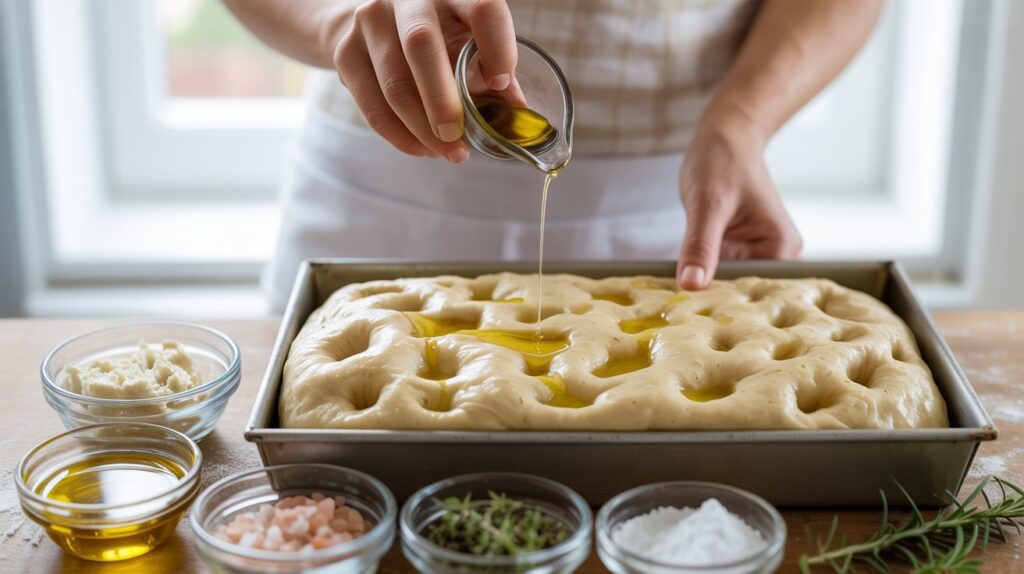
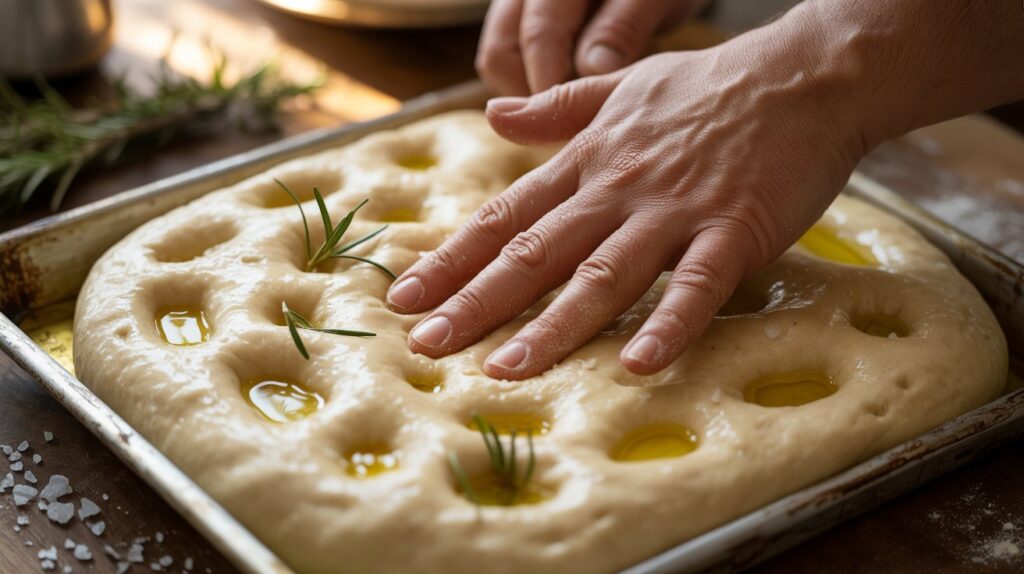
- Don’t skip the pan oil. Pour at least 3–4 tablespoons of olive oil into the pan before adding the dough. This is what creates that iconic crispy bottom.
- Dimple deeply. When pressing the dimples into the dough, push all the way to the bottom of the pan. Shallow dimples disappear during baking.
- Let it rise uncovered for the second proof. A light skin on the surface is totally fine and actually helps with texture.
- Bake hot. A 220°C (425°F) oven is key. Lower temps give you bread, not focaccia.
- Rest before cutting. Give it 10 minutes after baking. The crust firms up and the interior sets properly.
Common Mistakes to Avoid
- Using too little oil. Focaccia is supposed to be oily. If your pan looks dry, add more. Underoiling is the #1 reason focaccia comes out dry and bland.
- Rushing the second rise. After you transfer the dough to the pan, it needs at least 45–60 minutes to puff up. Cutting this short leads to dense, flat bread.
- Overworking the dough. This isn’t pizza dough. Mix until just combined and use stretch-and-fold instead of kneading. Overworking tightens the gluten and makes it tough.
- Forgetting to season the top. Flaky salt, herbs, and olive oil on top aren’t optional — they’re what make focaccia taste like focaccia.
Flavor Variations
Focaccia is a blank canvas. Here are some easy ways to switch it up:
- Rosemary & Garlic: The classic. Press fresh rosemary sprigs and thin garlic slices into the dimples before baking.
- Olives & Sun-Dried Tomatoes: Press kalamata olives and chopped sun-dried tomatoes into the dough for a Mediterranean vibe.
- Caramelized Onion: Spread sweet caramelized onions over the top with fresh thyme — pairs beautifully with the sourdough tang.
- Cheese & Herb: Sprinkle shredded parmesan and dried oregano over the top in the last 5 minutes of baking.
- Spicy: Add red pepper flakes and sliced fresh chili to the olive oil topping for a kick.
What to Serve With Sourdough Discard Focaccia
This focaccia is incredibly versatile. Here’s how to use it:
- As a side with soups, stews, or pasta dishes — it’s perfect for soaking up sauces.
- Sandwich bread — slice horizontally and fill with fresh mozzarella, tomatoes, and basil.
- Appetizer — serve warm squares with a bowl of marinara or olive oil and balsamic for dipping.
- With cheese boards — the mild tang pairs well with soft cheeses like burrata or ricotta.
Storage and Reheating
Room temperature: Store wrapped in a clean kitchen towel or loosely covered at room temperature for up to 2 days. Avoid airtight containers — they make the crust soggy.
Freezing: Cut into squares, wrap individually in plastic wrap, and freeze for up to 3 months. Thaw at room temperature.
Reheating: For the best results, reheat in a 180°C (350°F) oven for 5–8 minutes directly on the rack. This revives the crispy bottom and warm, soft interior. Avoid the microwave — it makes focaccia rubbery.
View Full Recipe

Sourdough Discard Focaccia Recipe
Description
This sourdough discard focaccia is golden and crispy on the outside, pillowy soft inside, and loaded with olive oil flavor. It's the best way to use up your sourdough discard — no wasted starter, just incredible bread.
Ingredients
Instructions
-
Step 1 — Activate the Yeast (0–5 min)
In a large mixing bowl, combine warm water, instant yeast, and sugar. Stir briefly and let it sit for 5 minutes until slightly foamy. This confirms your yeast is active.
-
Step 2 — Mix the Dough (5–10 min)
Add the sourdough discard, fine sea salt, and 2 tablespoons of olive oil to the yeast mixture. Stir to combine. Add the flour all at once and mix with a wooden spoon or your hands until a shaggy, sticky dough forms. Do not knead — just mix until no dry flour remains.
-
Step 3 — Stretch and Fold (10–40 min)
Cover the bowl with a damp towel. Every 10 minutes for 30 minutes, perform one set of stretch-and-folds: grab one side of the dough, stretch it up, and fold it over the center. Rotate the bowl 90° and repeat 3–4 times. This builds structure without kneading.
-
Step 4 — First Rise (40–70 min)
After the final fold, cover the bowl tightly and let the dough rise at room temperature for 30 minutes, until noticeably puffy. Meanwhile, pour 3 tablespoons of olive oil into a 9x13 inch baking pan and spread it to coat the bottom and sides generously.
-
Step 5 — Transfer and Second Rise (70–130 min)
Gently scrape the dough into the oiled pan. Use your fingers to stretch it toward the edges. If it springs back, let it rest 5 minutes, then try again. Drizzle 1 tablespoon of olive oil over the top, cover loosely, and let it rise for 45–60 minutes until puffy and filling the pan.
-
Step 6 — Dimple and Top (130–135 min)
Preheat your oven to 220°C (425°F). Once the dough is puffy, oil your fingers and press deep dimples all over the surface, pushing all the way to the bottom of the pan. Drizzle with a little more olive oil, then scatter flaky sea salt, rosemary, and garlic slices on top.
-
Step 7 — Bake (135–160 min)
Bake on the middle rack for 22–25 minutes until deep golden brown on top and the edges are visibly crispy. The bottom should be golden too — check by lifting one corner with a spatula. Remove from the oven and let cool in the pan for 10 minutes before cutting.
Nutrition Facts
Servings 8
- Amount Per Serving
- Calories 310kcal
- % Daily Value *
- Total Fat 12g19%
- Saturated Fat 2g10%
- Sodium 480mg20%
- Total Carbohydrate 44g15%
- Dietary Fiber 2g8%
- Sugars 1g
- Protein 7g15%
* Percent Daily Values are based on a 2,000 calorie diet. Your daily value may be higher or lower depending on your calorie needs.
Note
- Oil is not optional: Focaccia gets its signature crispy bottom from a well-oiled pan. Use at least 3 tablespoons of olive oil in the pan before adding the dough, and don't be shy with the drizzle on top before baking.
- Room temperature discard works best: Straight-from-the-fridge discard can slightly slow the rise. If you have time, take it out 30 minutes before starting. Cold discard still works — just allow a little extra time for the rises.
- Don't overbake: The focaccia is done when the top is deep golden brown and the edges pull slightly from the sides of the pan. Overbaking dries it out. If the top browns too fast, tent loosely with foil in the last 5 minutes.