
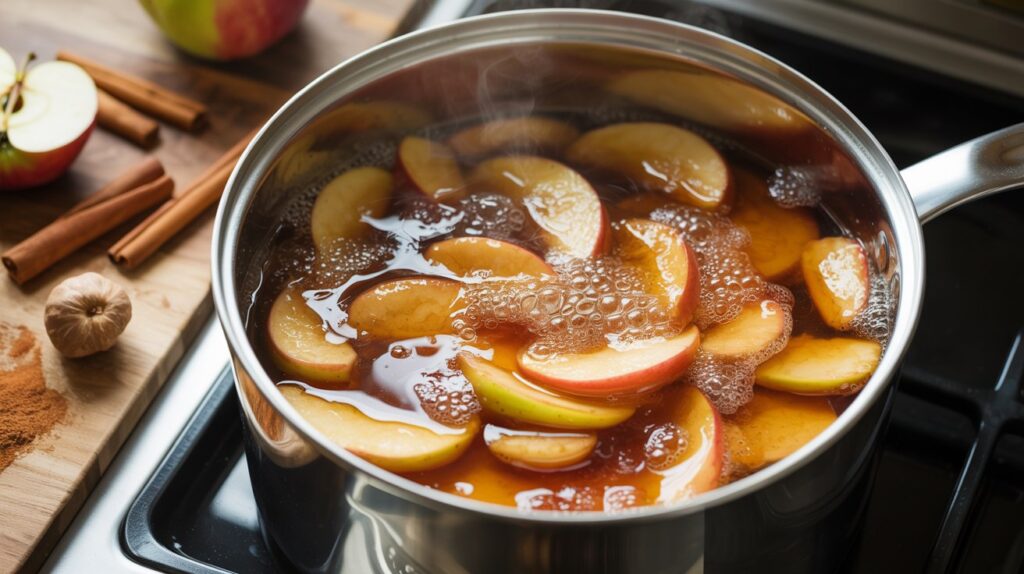
This homemade canned apple pie filling is everything the store-bought version wishes it could be. Tender apple slices suspended in a thick, golden cinnamon-spiced syrup — made with real ingredients you can actually pronounce. Preserve it in jars now and pull it out all year long for pies, crisps, pancake toppings, and more.
Why You’ll Love This Canned Apple Pie Filling Recipe

Store-bought canned filling is often too sweet, too starchy, and loaded with artificial flavors. This homemade version fixes all of that:
- Real apple flavor — fresh apples, not mushy canned ones.
- Perfectly spiced — cinnamon, nutmeg, and a hint of lemon for brightness.
- Shelf-stable for 12–18 months — using a safe, tested water-bath canning method.
- Versatile — use it for pies, cobblers, crisps, French toast, cheesecake topping, and oatmeal.
- No preservatives or artificial thickeners — just wholesome pantry ingredients.
What Makes This Recipe Special
The secret to this recipe’s perfect texture is Clear Jel — a modified cornstarch that is specifically approved for home canning. Regular cornstarch breaks down during the canning process and can create unsafe density in the jar center, preventing proper heat penetration. Clear Jel holds up beautifully, giving you a glossy, thick syrup that doesn’t turn watery or cloudy.

The apple slices are also blanched briefly before packing, which softens them just enough so they don’t leave air pockets in the jar, while still holding their shape after baking. You’ll never get a soggy, collapsed pie filling again.
Ingredients You’ll Need
This recipe yields approximately 7 quart jars — enough to stock your pantry for the whole year. The most important ingredient to source before you start is Clear Jel; it’s available online and at most home canning supply stores.
- Fresh apples — about 6 lbs (2.7 kg); firm varieties like Granny Smith, Honeycrisp, or Fuji hold their shape best during canning.
- Clear Jel (Cook-type) — the only thickener safe for home canning; do not substitute with cornstarch or flour.
- Granulated white sugar — sweetens the syrup and helps preserve the filling.
- Brown sugar — adds a warm, caramel-like depth to the syrup.
- Water — forms the base of the syrup.
- Apple juice or cider — intensifies the apple flavor in every jar.
- Fresh lemon juice — adds brightness and helps prevent browning; use bottled for consistent acidity if canning.
- Ground cinnamon — the essential warm spice.
- Ground nutmeg — subtle but important; don’t overdo it.
- Salt — just a pinch; it balances all the sweetness.
Pro-Tips for Success

- Use firm apple varieties. Soft apples like McIntosh or Cortland turn to mush during processing. Stick with Granny Smith, Honeycrisp, Braeburn, or Golden Delicious for slices that hold their shape.
- Do not substitute Clear Jel. This is non-negotiable for safe canning. Regular cornstarch, flour, or tapioca can create dangerous density in the jar that prevents proper heat distribution. Clear Jel is tested and approved by the USDA for this exact purpose.
- Keep peeled apples in lemon water. As you peel and slice, drop the apples into a bowl of cold water with a splash of lemon juice. This prevents browning while you prep the rest of the batch.
- Blanch your apples in batches. Don’t crowd the pot. Blanching in smaller batches ensures every slice gets the same brief heat exposure and stays evenly firm.
- Leave proper headspace. Always leave exactly 1 inch (2.5 cm) of headspace in each quart jar. Too little and the lids won’t seal; too much and the contents may discolor.
- Process at the correct altitude. Processing times increase at higher altitudes. If you live above 300 meters (1,000 feet), add additional processing time per USDA guidelines.
Common Mistakes to Avoid
- Using soft or overripe apples. They break down completely during processing and you’ll end up with applesauce, not pie filling. Always choose firm, slightly underripe apples for the best texture.
- Substituting the thickener. Using cornstarch, flour, or instant tapioca instead of Clear Jel is a food safety risk during canning — not just a texture issue. The USDA specifically advises against it. If you can’t find Clear Jel, make a fresh (non-canned) batch instead.
- Skipping the blanching step. Raw apple slices shrink significantly when heated, leaving large air pockets in your jars. Blanching first compacts them, ensures safe packing density, and gives you fuller, more attractive jars.
- Not checking jar seals after cooling. After the jars cool for 12–24 hours, press the center of each lid. It should be firm and concave. Any lid that flexes up and down (“pops”) did not seal and must be refrigerated and used within 2 weeks.
Flavor Variations
- Caramel Apple Filling: Replace the brown sugar with ½ cup dark muscovado sugar and add 1 teaspoon vanilla extract to the syrup for a deep, caramel-forward flavor.
- Spiced Apple Pear Filling: Replace one-third of the apples with firm Bosc pears. Add ¼ teaspoon ground cardamom and ¼ teaspoon ground ginger alongside the cinnamon.
- Cranberry Apple Filling: Stir in 1 cup fresh or frozen cranberries per batch for a tart, holiday-ready filling that pairs beautifully with a buttery crust.
- Reduced Sugar Version: Cut the white sugar by 25% and increase the apple juice by ¼ cup. The filling will be less sweet and slightly thinner but still delicious and safe to can.
- Boozy Apple Filling (Not for Canning): If making a fresh (non-canned) batch, stir in 2 tablespoons of bourbon or dark rum at the end for an adults-only dessert filling.
What to Serve With Canned Apple Pie Filling
Once you have jars on your shelf, the possibilities are endless:
- Classic apple pie — just pour directly into your pie crust and bake.
- Apple crisp or crumble — top with oat streusel and bake for 30 minutes.
- Cheesecake topping — spoon over a baked or no-bake cheesecake.
- Pancakes or waffles — warm slightly and spoon over a stack.
- French toast filling — stuff thick brioche slices and pan-fry in butter.
- Puff pastry turnovers — the easiest hand pies you’ll ever make.
- Vanilla ice cream topping — warm the filling slightly and pour over a scoop.
Storage and Reheating
Sealed jars (pantry): Properly sealed jars store in a cool, dark pantry for up to 18 months. Quality is best within the first 12 months.
After opening: Refrigerate any opened jar and use within 7–10 days. Always use a clean spoon to scoop from the jar.
Freezing (alternative to canning): If you don’t want to process the jars, let the filling cool completely and freeze in freezer-safe containers for up to 12 months. Thaw overnight in the refrigerator before using.
Reheating: For most uses, warm the filling in a small saucepan over low heat, stirring gently, until heated through. A splash of apple juice can loosen it if it’s thicker than you’d like after opening.
View Full Recipe

Canned Apple Pie Filling Recipe
Description
This homemade canned apple pie filling is made with fresh firm apples, warm cinnamon spices, and Clear Jel for a safe, perfectly thick syrup that lasts up to 18 months on the shelf. One big batch — endless pies, crisps, and toppings all year long.
Ingredients
Instructions
-
Step 1: Prepare the Jars (0–10 min)
Wash 7 quart canning jars, lids, and bands in hot soapy water and rinse well. Place jars in your water-bath canner filled with water and bring to a simmer (180°F / 82°C) to keep them hot until needed. Place lids in a small saucepan of hot (not boiling) water. Never boil modern lids — it can damage the sealing compound.
-
Step 2: Prep the Apples (10–30 min)
Peel, core, and slice the apples into ½-inch thick slices. As you work, drop the slices into a large bowl of cold water with a splash of lemon juice to prevent browning. Working in batches of about 6 cups, blanch the apple slices in a large pot of boiling water for 1 minute per batch. Remove with a slotted spoon and keep warm in a covered bowl or pot. Do not discard the blanching water.
-
Step 3: Make the Syrup (30–40 min)
In a large stainless steel saucepan, whisk together the Clear Jel, white sugar, brown sugar, and salt until combined. Gradually whisk in the cold water and apple juice until smooth with no lumps. Cook over medium-high heat, stirring constantly, until the mixture thickens and begins to bubble — about 5–7 minutes. Once it's bubbling, cook for 1 more minute, stirring constantly. Remove from heat and stir in the lemon juice, cinnamon, and nutmeg.
-
Step 4: Pack the Jars (40–50 min)
Remove one hot jar from the canner. Working quickly, fold the warm blanched apple slices into the hot syrup (about 3½ cups of apples per quart jar). Ladle the apple-syrup mixture into the jar, leaving exactly 1 inch (2.5 cm) of headspace. Remove air bubbles by sliding a thin spatula or bubble remover tool around the inside edge of the jar. Wipe the jar rim with a clean damp cloth, center a lid on top, and screw on the band to fingertip-tight. Repeat for all jars.
-
Step 5: Process the Jars (50–75 min)
Lower the filled jars into the boiling water-bath canner using a jar lifter. Ensure jars are covered by at least 1 inch of water. Place the lid on the canner and bring back to a full rolling boil. Once boiling, process quart jars for 25 minutes (adjust for altitude if needed: add 5 min for 300–900m, add 10 min for 900–1800m). Do not start the timer until the water is at a full boil.
-
Step 6: Cool and Check Seals (75 min – 12 hr)
Turn off the heat and remove the canner lid. Let the jars sit in the hot water for 5 minutes before removing. Use a jar lifter to transfer jars to a towel-lined counter. Leave 1–2 inches of space between jars and do not tilt them. Do not touch or press the lids yet. Allow to cool undisturbed for 12–24 hours. Once fully cool, check each seal by pressing the center of the lid — it should be firm and concave. Any unsealed jars must be refrigerated and used within 2 weeks.
Nutrition Facts
Servings 7
- Amount Per Serving
- Calories 210kcal
- % Daily Value *
- Sodium 45mg2%
- Total Carbohydrate 54g18%
- Dietary Fiber 3g12%
- Sugars 44g
* Percent Daily Values are based on a 2,000 calorie diet. Your daily value may be higher or lower depending on your calorie needs.
Note
- Source Clear Jel Before You Start: Clear Jel (Cook-type, not Instant) can be tricky to find locally. Check Amazon, Walmart's canning section, or specialty stores like Ball or Lehman's online. Buy it before shopping for apples — without it, you cannot safely can this recipe. Instant Clear Jel is a different product and is NOT suitable for canning; always confirm you have the Cook-type.
- Batch Processing Works Best: If making multiple batches, prepare all your apples first and keep them submerged in lemon water. Then make the syrup fresh for each batch — don't try to make one giant batch of syrup ahead of time, as it thickens quickly and becomes difficult to work with once it starts to cool.
- Always Use New Lids: Canning bands (rings) can be reused season after season if they're in good condition. But the flat lids must always be new — the sealing compound on used lids may not create a reliable vacuum seal, which can lead to jar failure or spoilage. New lids are inexpensive and the safety insurance is absolutely worth it.