
If you’ve ever seen a towering cone of rings decorated with white icing at a Scandinavian celebration and wondered how it’s made, this kransekake recipe has all the answers. Kransekake — meaning “wreath cake” in Norwegian and Danish — is one of the most iconic celebration cakes in the Nordic world. It’s served at weddings, Christmas, New Year’s Eve, and national holidays. The good news is that despite its dramatic appearance, the recipe itself is surprisingly straightforward. Three ingredients in the dough, a few hours of your time, and you’ll have a showstopper centerpiece that tastes as good as it looks.
Why You’ll Love This Kransekake Recipe

- Only 3 ingredients in the dough — Almond flour, powdered sugar, and egg whites. No butter, no dairy, no complicated components.
- Naturally gluten-free — The entire cake is made without any wheat flour, making it suitable for gluten-free guests.
- Extraordinarily chewy and delicious — The texture is somewhere between a macaroon and marzipan — dense, chewy, deeply nutty, and sweet without being cloying.
- A guaranteed showstopper — Stack the rings into a tower and nobody in the room will be able to look away from it.
- Make-ahead friendly — The rings actually taste better after a day or two, making this ideal for preparing in advance of a big event.
What Makes This Recipe Special
Traditional kransekake dough is made with raw marzipan or a combination of almond flour and sugar that is briefly cooked — a step many recipes skip. This version uses a warm-process method where the dough is gently heated before baking. That extra step makes the rings chewier on the inside and slightly crisped on the outside, which is exactly how an authentic kransekake should feel.
The icing is a simple royal icing piped in a signature zigzag pattern. It dries firm, holds the tower together structurally, and adds a beautiful visual contrast against the golden almond rings. This recipe gives you 18 rings which stack into a classic kransekake tower about 40cm tall — impressive enough for any occasion.


Ingredients You’ll Need
The ingredient list is refreshingly short. Quality matters most with almond flour — use a finely ground, blanched variety for the smoothest dough and most delicate texture.
- Blanched almond flour (finely ground) — This is the entire base of the dough. Finely ground is essential — coarse almond meal will give a gritty texture and the rings won’t hold their shape as well.
- Powdered sugar (icing sugar) — Sifted. Lumpy sugar leads to a lumpy dough that won’t pipe or roll smoothly.
- Egg whites — Room temperature. They bind the dough and give the rings their characteristic chewy texture. Do not use egg white substitutes here.
- Almond extract (optional but recommended) — A small amount intensifies the almond flavor without overpowering it. Pure extract only — artificial almond extract can taste medicinal.
- Powdered sugar (for icing) — The base of the royal icing glaze.
- Egg white or meringue powder (for icing) — Binds the icing and helps it dry firm.
- Lemon juice (for icing) — A few drops give the icing a subtle brightness and help it set properly.
Pro-Tips for Success
- Warm the dough before shaping. After mixing, the dough will be quite stiff. Warming it gently — either by placing the bowl over hot water for a few minutes or giving it a brief 20-second microwave — makes it much easier to roll into ropes without cracking. Don’t skip this step.
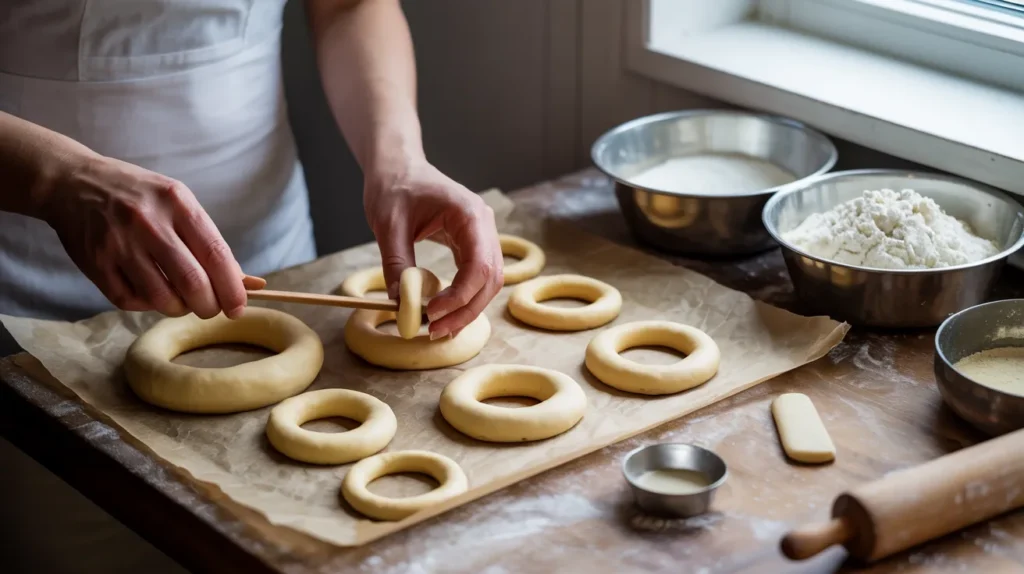
- Use kransekake molds if you can. These are inexpensive graduated ring molds that give you perfectly uniform rings. Without them you’ll need to shape the rings freehand by rolling ropes and joining the ends — achievable but requires more patience and a template.
- Make a paper template if going freehand. Print or draw circles in graduated sizes from about 5cm to 26cm in diameter. Place under parchment paper on your baking sheet and use as a guide when shaping the rings.
- Roll the dough ropes on a lightly oiled surface, not floured. Flour dries out the outside of the ropes and can cause the rings to crack in the oven. A very light brush of neutral oil on the work surface keeps them smooth and pliable.
- Let the rings cool completely before removing from molds. Hot rings are fragile. Give them at least 30 minutes before you attempt to lift them out — they firm up significantly as they cool.
- Pipe the icing while assembling the tower. Don’t ice all the rings first and then try to stack them — the icing acts as glue. Ice and stack one ring at a time, working from the largest ring upward.
Common Mistakes to Avoid
- Using coarse almond meal instead of fine almond flour. This is the biggest texture mistake. Coarse almond meal makes the dough crumbly, the rings crack easily, and the finished texture is gritty rather than smooth and chewy. Look for “superfine” or “blanched almond flour” specifically.
- Overbaking the rings. Kransekake rings should be pale golden — not brown. Overbaking dries them out and makes them hard and crumbly rather than chewy. Every oven is different, so start checking at 12 minutes. The rings are done when the base is just lightly golden and the top looks set but still pale.
- Making the icing too thin. Runny icing slides off the rings and pools at the base instead of holding its zigzag shape. The icing should be thick enough to hold a ribbon shape when you lift the piping bag — similar to the consistency of toothpaste. Add powdered sugar a tablespoon at a time until you reach the right consistency.
- Stacking before the icing sets. Give each layer at least 2–3 minutes before stacking the next ring on top. If you rush, the rings slide and the tower leans. Patience here pays off in a perfectly straight tower.
Flavor Variations
- Cardamom Spiced: Add 1 teaspoon of ground cardamom to the dough. Cardamom is a traditional Nordic spice that pairs beautifully with almond — it gives the kransekake a warmly aromatic, festive quality.
- Chocolate Dipped: Once the tower is assembled and the icing is dry, melt dark chocolate and drizzle it over the rings in addition to or instead of the white icing. The bittersweet chocolate cuts the sweetness of the almond dough perfectly.
- Rose Water: Replace the almond extract with 1 teaspoon of rose water for a floral, Middle Eastern-inspired variation that’s delicate and fragrant.
- Lemon Almond: Add the finely grated zest of one lemon to the dough and use lemon juice in the icing. Bright, fresh, and a little unexpected.
- Mini Kransekake Cones: Instead of a full tower, use the same dough to make individual small cones (3–4 rings each) as elegant individual portion desserts or party favors.
What to Serve With Kransekake Recipe

Kransekake is traditionally served as the centerpiece of a celebration table. Here’s how to serve it and what to pair it with:
- Champagne or sparkling wine — The classic pairing for weddings and New Year’s. The bubbles and acidity balance the dense sweetness of the almond rings.
- Aquavit — The traditional Scandinavian spirit, served ice cold alongside kransekake at Norwegian celebrations.
- Coffee or black tea — The bitterness of strong coffee complements the sweet, chewy almond rings perfectly for a less formal occasion.
- Fresh berries — Scatter lingonberries, raspberries, or strawberries around the base of the tower for color and a fresh counterpoint to the richness.
- Norwegian flags and ribbon — Traditional decoration involves small Norwegian (or Danish) flags tucked between the rings and thin ribbon threaded through the tower. It makes the presentation truly authentic.
Storage and Reheating
Room temperature: Kransekake keeps extremely well at room temperature. Store assembled or unassembled rings in an airtight container for up to 1 week. The texture actually improves after 24–48 hours as the rings soften slightly and the flavors deepen — this is why professional bakers often make kransekake a day or two before the event.
Freezing uniced rings: The baked, uniced rings freeze beautifully for up to 3 months. Wrap each ring individually in plastic wrap and place in a sealed freezer bag. Thaw at room temperature for 2–3 hours before assembling and icing. Do not freeze assembled kransekake — the icing becomes sticky and the rings lose their crispness.
Humidity warning: Kransekake does not like humidity. In very humid conditions the icing becomes sticky and the rings soften too much. Store in a cool, dry place and assemble as close to serving time as possible in humid climates.
View Full Recipe

Kransekake Recipe
Description
This kransekake recipe produces the classic Scandinavian tower cake made from chewy almond rings decorated with white royal icing. Naturally gluten-free, made with just 3 dough ingredients, and stunning enough for any celebration table.
Ingredients
Instructions
-
Step 1 — Mix the Dough (0–10 min)
In a large bowl, combine the sifted powdered sugar and finely ground almond flour. Whisk together until evenly mixed. Add the egg whites and almond extract. Mix with a wooden spoon or your hands until a firm, slightly sticky dough forms. It will come together into a cohesive mass — if it feels too dry, add egg white half a teaspoon at a time. If too wet, add a small amount of almond flour.
-
Step 2 — Warm the Dough (10–15 min)
Place the bowl of dough over a pot of hot (not boiling) water, like a double boiler, and stir gently for 3–4 minutes until the dough is warm to the touch and slightly softened. Alternatively, microwave the dough for 15–20 seconds, stir, and check. This warm-process step is key to the authentic chewy texture — it partially cooks the proteins and makes the dough much easier to roll. Cover the dough with plastic wrap and let it rest for 15 minutes.
-
Step 3 — Prepare Molds and Oven (15–20 min)
Preheat your oven to 190°C (375°F). If using kransekake molds, lightly grease them with butter or non-stick spray. If going freehand, line two large baking sheets with parchment paper and place your graduated circle templates underneath. You will need 18 rings ranging from approximately 5cm to 26cm in diameter, increasing by about 1.2cm per ring.
-
Step 4 — Shape the Rings (20–50 min)
Divide the dough into 18 portions. Working with one portion at a time (keep the rest covered), roll the dough into a long rope on a very lightly oiled surface. The rope should be about 1.5cm (just over half an inch) in diameter — consistent thickness is important so all rings bake evenly. Press the rope into the mold grooves or shape freehand into a ring using your template, pressing the two ends together firmly. Smooth any cracks by pressing gently with wet fingertips.
-
Step 5 — Bake the Rings (50–65 min)
Bake the rings in batches (or all at once if your oven is large enough) for 12–15 minutes, until the bases are lightly golden and the tops look set and dry. The rings should remain pale on top — not golden brown. Watch carefully from the 12-minute mark as they can go from perfect to overbaked quickly. Remove from the oven and let cool in the molds for at least 30 minutes before attempting to remove — they are fragile when hot.
-
Step 6 — Make the Royal Icing (65–70 min)
In a bowl, combine the sifted powdered sugar, egg white (or meringue powder mixture), and lemon juice. Beat with a hand mixer or by hand until the icing is smooth, bright white, and holds a firm ribbon when you lift the spoon. It should be thick — similar to toothpaste consistency. Add water a few drops at a time if it is too thick to pipe, but do not make it runny. Transfer to a piping bag fitted with a small round tip (2–3mm opening).
-
Step 7 — Assemble the Tower
Place the largest ring on your serving plate or cake board. Pipe a zigzag pattern of icing across the top of this ring. Place the next ring (second largest) on top, pressing gently. Pipe icing on this ring and continue stacking from largest to smallest. Allow 2–3 minutes between stacking each ring so the icing can begin to set and hold the structure. Once fully assembled, pipe a final decorative zigzag over the entire outside of the tower.
-
Step 8 — Decorate and Set
Decorate with small Norwegian or Danish flags, thin ribbon threaded between the rings, edible flowers, or fresh berries around the base. Let the assembled kransekake stand undisturbed for at least 1 hour for the icing to fully set and harden before moving or transporting. The icing acts as both decoration and structural glue — it needs time to do its job.
Nutrition Facts
Servings 18
- Amount Per Serving
- Calories 210kcal
- % Daily Value *
- Total Fat 11g17%
- Saturated Fat 1g5%
- Sodium 15mg1%
- Total Carbohydrate 26g9%
- Dietary Fiber 2g8%
- Sugars 22g
- Protein 5g10%
* Percent Daily Values are based on a 2,000 calorie diet. Your daily value may be higher or lower depending on your calorie needs.
Note
- Fine Almond Flour is Non-Negotiable: The quality and grind of your almond flour makes or breaks this recipe. Use blanched, superfine almond flour — not coarse almond meal. Bob's Red Mill Super-Fine Almond Flour or similar finely ground varieties work perfectly. Coarse meal produces a crumbly, gritty dough that won't roll cleanly and will crack during baking.
- Rings Taste Better the Next Day: Freshly baked kransekake rings are good, but they reach their best texture and flavor 24–48 hours after baking. The outside develops a very slight crust while the inside stays chewy and moist. Plan to bake the rings the day before your event, store them in an airtight container overnight, and assemble with icing on the day of serving.
- The Icing is the Structure: Don't treat the royal icing as just decoration — it is the glue that holds the entire tower together. Make sure it is thick enough to hold its shape when piped (toothpaste consistency), and give each layer time to partially set before stacking the next ring. A thin, runny icing will cause the tower to lean or collapse. If your icing is too thin, beat in more sifted powdered sugar until it thickens up.