

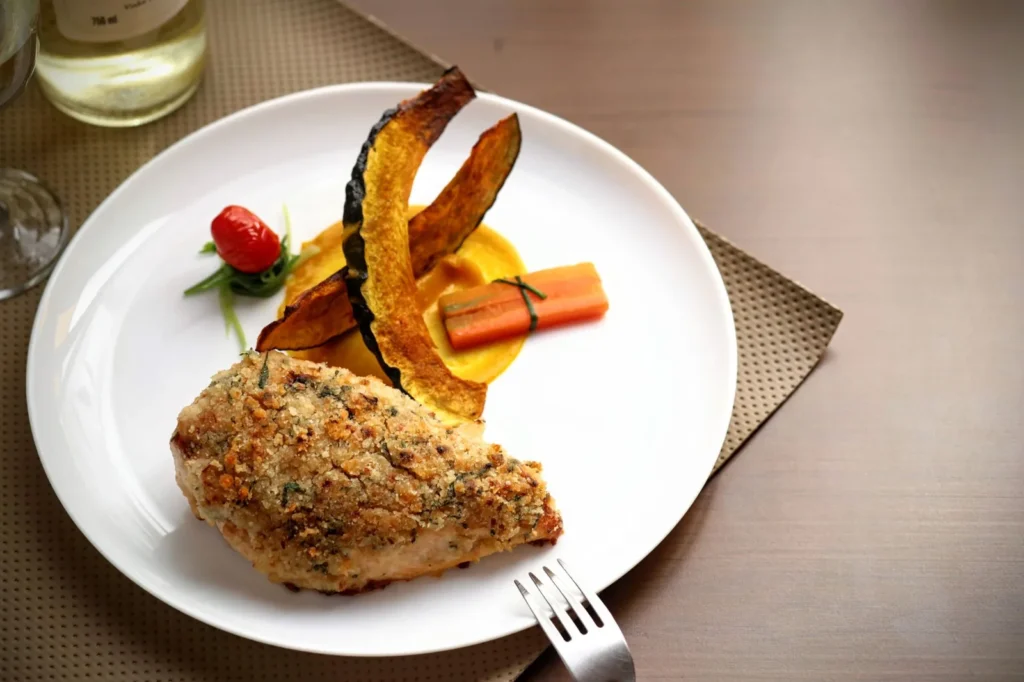
A good walnut crusted chicken recipe turns plain chicken breasts into something with real crunch and a toasty, nutty flavor that holds up against a sharp salad or a creamy side. The method below uses a three-step breading with ground walnuts so the coating stays put instead of sliding off in the pan. You get a weeknight dinner that looks like more effort than it is.
The texture comes from finely chopping the walnuts and mixing them with flour and egg, which gives the crust something to grip. Because walnuts brown faster than breadcrumbs, the heat stays moderate so the inside cooks before the outside burns. This version is built for a standard skillet and a half-hour window. If you enjoyed this, our chicken quesadillas is worth trying next. Making this walnut crusted chicken at home is surprisingly straightforward once you know the key steps.
Why You’ll Love These Walnut Crusted Chicken
- Crunchy coating that stays attached because the egg and flour base grips the nuts
- Nutty flavor deeper than plain breadcrumbs without needing extra seasoning
- Works with chicken breasts or thighs using the same timing
- Freezes well, so you can make extra for later in the week
Ingredients You’ll Need
- 4 boneless skinless chicken breasts (about 680 g / 1.5 lb), pounded to 1.5 cm thickness
- 120 g / 1 cup walnuts, finely chopped (not powdered)
- 60 g / 0.5 cup all-purpose flour
- 2 large eggs, beaten with 1 tbsp water
- 1 tsp salt
- 0.5 tsp black pepper
- 0.5 tsp garlic powder
- 3 tbsp olive oil, for pan-frying
- 1 tbsp lemon juice, added after cooking
Ingredient Substitutions
Walnuts: Replace with an equal weight of pecans for a sweeter, softer crunch. Pecans brown a little quicker than walnuts, so drop the heat by one notch and check the crust at the 4-minute mark on each side. The flavor reads milder and the coating is slightly less rigid. The walnut crusted chicken works well for weeknight cooking when time is limited.





All-purpose flour: Use an equal weight of rice flour if you want a tighter, crisper shell. Rice flour absorbs less moisture from the egg, so the crust sets faster and stays lighter in color. Expect a thinner, shatter-prone layer rather than a thick blanket. Storing leftover walnut crusted chicken correctly keeps it tasting good for days.
Olive oil: Swap for 3 tbsp of avocado oil if you need a higher smoke point. Avocado oil keeps the pan steadier at medium heat without smelling fruity. The crust browns a touch more evenly but the taste difference is small. For the best results with this walnut crusted chicken, read through all the steps before starting.
Chicken breasts: Use 680 g of boneless thighs if you prefer darker meat. Thighs carry more fat, so they stay juicy at 6 minutes per side and need no pounding. The crust can slip more, so press the coating on firmly before the pan. For another easy option, check out our chicken parmigiana.
Step-by-Step Instructions
- Pat the chicken dry with paper towels, then pound each breast to an even 1.5 cm thickness so they cook at the same rate. Season both sides with salt, pepper, and garlic powder.
- Set up three shallow dishes: flour in the first, beaten egg with water in the second, chopped walnuts in the third. Coat one piece of chicken in flour, shake off excess, then egg, then press into walnuts on both sides.
- Heat 3 tbsp olive oil in a 30 cm skillet over medium heat until the oil shimmers but does not smoke. Lay the coated chicken in without touching for even browning.
- Cook 5 minutes on the first side until the underside is golden and crispy, then flip and cook another 5 minutes until the second side matches and the center hits 74°C / 165°F.
- Rest the chicken on a wire rack for 3 minutes so the crust stays firm, then finish with 1 tbsp lemon juice split across the pieces. chicken goujons use a similar coating step if you want a smaller shape.
Pro Tips
Chop walnuts by hand or pulse in a food processor for 4 seconds; powdering them turns the crust pasty instead of crunchy. You want rough fragments around 3 mm in size.
Press the walnuts into the egg layer with the flat of your hand so they embed rather than sit loose. A loose coat drops off the moment it hits the oil.
Use a wire rack instead of a plate for resting, because trapped steam under the chicken softens the bottom crust within a minute. pan-frying technique from Simply Recipes covers heat control in more depth.
Pound the breasts to an even thickness before breading so the thin end does not overcook while the thick end stays raw. A 1.5 cm target keeps the window tight.
Common Mistakes to Avoid
Overheating the oil is the main reason the walnuts burn before the chicken cooks. Keep the pan at medium heat and test with one corner piece if you are unsure.
Skipping the flour step leaves the egg sliding on bare meat, so the walnuts fall off. The flour gives the egg something to cling to across the whole surface.
Crowding the skillet drops the oil temperature and steams the coating. Cook in two batches if needed so each piece sits in contact with hot oil.
Serving Suggestions
Slice the chicken and lay it over arugula with shaved parmesan for a warm salad that balances the nuts. The bitter greens cut the richness without needing a heavy dressing.
Pair with creamy lemon chicken style sides like buttered green beans if you want a fuller plate. Roasted potatoes also work because they soak up the lemon finish.
For a sandwich, place a whole piece in a ciabatta with mayo and tomato. The crust holds for about 10 minutes before softening, so serve immediately.
Storage and Reheating
Refrigerate leftovers in an airtight container for up to 3 days, separated by parchment so the crusts do not stick. Cooked poultry should not sit out for more than 2 hours total.
Reheat in a 180°C / 350°F oven for 10 minutes until the center reaches 74°C / 165°F again. The oven keeps the crust firm, while a microwave makes it limp.
Freeze cooked pieces on a tray, then bag them for freeze for up to 2 months. Thaw overnight in the fridge before reheating so the inside warms before the outside dries.
Recipe Variations
Herb Version
Mix 1 tbsp chopped thyme and rosemary into the walnuts before coating. The herbs crisp with the nuts and give a piney note that suits roasted vegetables. Expect a darker, more aromatic crust.
Spicy Version
Add 1 tsp cayenne to the flour for a warm heat that builds after the first bite. Keep the pan at medium-low heat so the spice does not scorch. Serve with cooling yogurt sauce.
Oven-Baked Option
Place coated pieces on a lined tray and bake at 200°C / 400°F for 20 minutes, flipping once. You lose some skillet crunch but gain a hands-off cook; baked caesar chicken uses the same oven logic.
Walnut Sauce Pair
Spoon walnut sauce over the finished chicken for a double-nut plate. The soft sauce contrasts the crust and adds moisture if the meat sits a few minutes. Use half the salt in the coating if you add this.

Walnut Crusted Chicken
Description
This walnut crusted chicken turns plain breasts into a crunchy, nutty skillet dinner using a three-step breading that keeps the coating attached. It is a weeknight-friendly meal that pairs well with sharp salads or creamy sides.
Ingredients
Instructions
-
Dry and pound chicken
Pat the chicken dry with paper towels so the surface is not slippery before coating. Then pound each breast to an even 1.5 cm thickness using a mallet so they all cook at the same rate and the thin end will not overcook while the thick end stays raw.
-
Season both sides
Season both sides of the pounded chicken with salt, black pepper, and garlic powder for even flavor. This light seasoning gives the nutty crust a base without needing extra herbs or spices.
-
Set up breading dishes
Set up three shallow dishes on your counter: flour in the first, beaten egg with 1 tbsp water in the second, and chopped walnuts in the third. This three-step station lets you coat each piece without crossing ingredients.
-
Coat in flour egg walnuts
Coat one piece of chicken in flour, shake off excess, then dip in egg, then press into walnuts on both sides using the flat of your hand. Pressing embeds the nuts so they will not sit loose and drop off the moment the chicken hits the hot oil.
-
Heat oil in skillet
Heat 3 tbsp olive oil in a 30 cm skillet over medium heat until the oil shimmers but does not smoke. Medium heat is important because walnuts brown faster than breadcrumbs and you want the inside to cook before the outside burns.
-
Cook first side
Lay the coated chicken in the skillet without touching the pieces so they brown evenly. Cook 5 minutes on the first side until the underside is golden and crispy and the crust is firmly attached.
-
Flip and finish cooking
Flip the chicken and cook another 5 minutes until the second side matches and the center hits 74°C / 165°F on an instant-read thermometer. Use the temperature check rather than color alone to confirm the poultry is safely cooked through.
-
Rest and add lemon
Rest the chicken on a wire rack for 3 minutes so the crust stays firm instead of softening from trapped steam. Then finish with 1 tbsp lemon juice split across the pieces for a bright finish.
Nutrition Facts
Servings 4
- Amount Per Serving
- Calories 420kcal
- % Daily Value *
- Total Fat 24g37%
- Saturated Fat 4g20%
- Cholesterol 130mg44%
- Sodium 480mg20%
- Total Carbohydrate 12g4%
- Dietary Fiber 2g8%
- Sugars 1g
- Protein 42g84%
* Percent Daily Values are based on a 2,000 calorie diet. Your daily value may be higher or lower depending on your calorie needs.
Note
- Storage: Refrigerate leftovers in an airtight container for up to 3 days, separated by parchment, and do not leave cooked poultry out more than 2 hours total.
- Reheating: Reheat in a 180°C / 350°F oven for 10 minutes until the center reaches 74°C / 165°F; a microwave makes the crust limp.
- Pro tip: Chop walnuts by hand or pulse 4 seconds for rough 3 mm fragments, and for a hands-off cook see our baked caesar chicken.
- Resting: Use a wire rack instead of a plate so trapped steam does not soften the bottom crust within a minute.
