

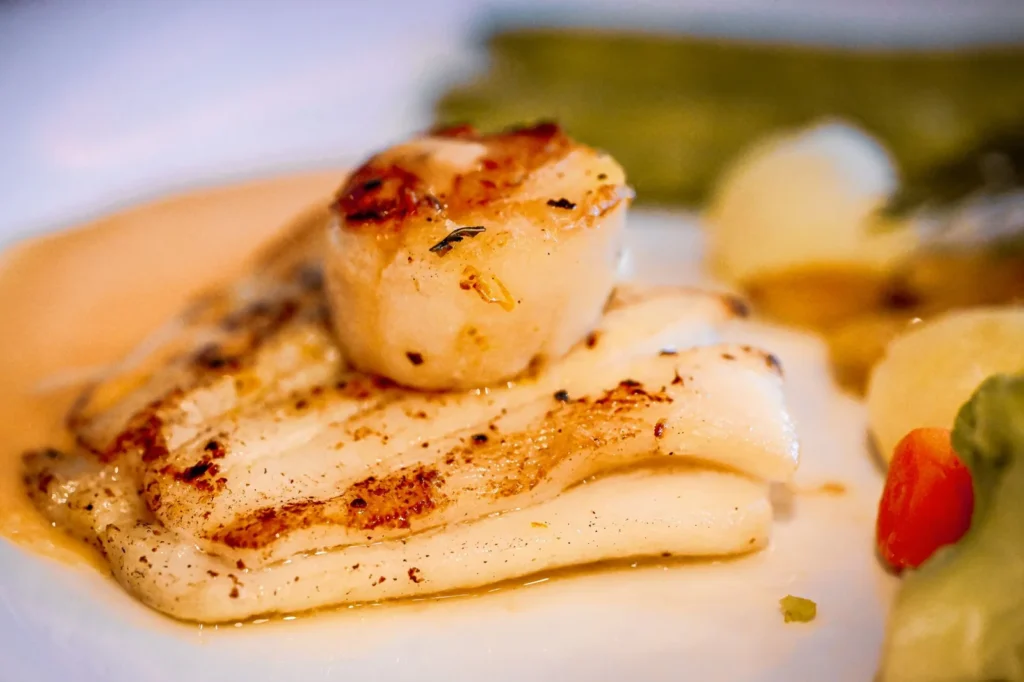
A great seared scallops recipe turns a few sea scallops into a restaurant-style plate with a caramelized crust and a sweet, barely opaque center. The method relies on dry scallops, high heat, and a short rest before the pan, not on fancy equipment. You’ll get a weeknight-friendly seafood dish that looks far more involved than it is.
Sea scallops cook in minutes, so the margin for error is small but easy to control. This version uses butter and a touch of oil for browning, with a bright finish of lemon and parsley. The result is a clean, savory bite that pairs with vegetables, grains, or a simple salad. If you enjoyed this, our home is worth trying next. Making this seared scallops at home is surprisingly straightforward once you know the key steps.
Why You’ll Love These Seared Scallops
- Ready in about 10 minutes from pat-dry to plate, so it fits a busy evening.
- Uses six everyday ingredients you can find at most grocery stores.
- Builds a deep golden crust through a dry surface and a hot pan, not extra fat.
- Naturally gluten free and low carb as written, with easy dairy swap options.
- Scales up or down without changing the core technique.
Ingredients You’ll Need
- 1 pound sea scallops (about 10 to 12), patted very dry — look for dry-packed, not soaked in brine.
- 1 tablespoon avocado oil or neutral high-smoke oil — helps prevent butter from burning.
- 1 tablespoon unsalted butter — adds flavor and supports browning.
- 1/2 teaspoon fine sea salt — seasons the surface for a better crust.
- 1/4 teaspoon black pepper — light background heat.
- 1 tablespoon lemon juice, from about half a lemon — cuts richness at the end.
- 1 tablespoon chopped fresh parsley — fresh color and mild herbal note.
Ingredient Substitutions
Unsalted butter: Replace with an equal amount of ghee or clarified butter for a lactose-free version. Ghee tolerates higher heat before breaking down, so you can hold the pan a little longer without scorching. Expect a slightly nuttier aroma and the same golden finish on the scallops. The seared scallops works well for weeknight cooking when time is limited.







Avocado oil: Use refined olive oil or grapeseed oil in the same 1 tablespoon measure. Both have a neutral flavor and a smoke point high enough for the sear. The crust will brown a touch faster with grapeseed, so watch the edges closely. Storing leftover seared scallops correctly keeps it tasting good for days.
Fresh parsley: Swap for 1 teaspoon of chopped fresh chives or tarragon per tablespoon of parsley. Chives keep the look light; tarragon adds a faint anise note that pairs well with lemon. Dried parsley is weaker here and can taste dusty, so skip it if fresh isn’t available. For the best results with this seared scallops, read through all the steps before starting.
Lemon juice: Replace with 1 teaspoon of white wine vinegar mixed with 1 teaspoon of water. The acid stays bright but less fruity, which suits a richer butter finish. Add it off the heat so the sauce doesn’t turn sharp. For another easy option, check out our irish trash can.
Step-by-Step Instructions
- Place the scallops on a paper towel and pat the tops and sides dry; let them sit uncovered at room temperature for 10 minutes while you heat the pan.
- Set a 10-inch stainless or cast-iron skillet on medium-high heat and add the oil. Wait until the oil shimmers and a drop of water dances, about 1 minute.
- Season scallops with salt and pepper on both sides. Lay them in the pan without touching, never crowd the pan, and leave them undisturbed for 2 minutes.
- Add the butter to the side of the pan. Once it foams, flip each scallop and cook the second side for 90 seconds until golden and crispy.
- Transfer scallops to a warm plate. Pour lemon juice into the pan off heat, stir with the browned butter, then spoon over the scallops and top with parsley. serve immediately.
Pro Tips
Buy dry-packed scallops whenever possible; brine-soaked ones release water and steam instead of browning. If you only find wet-packed, soak them in a quick rinse and dry them longer on towels.
Preheat the pan fully before the oil goes in, since a cold start lowers the surface temperature and weakens the crust. A 10-inch pan holds a pound of scallops in one layer without crowding.
Use a thin metal spatula to release the scallops; if they stick, give them 20 more seconds rather than forcing them. The crust releases on its own once it sets.
For a deeper finish, rest the raw scallops on a rack in the fridge uncovered for 30 minutes to dry the surface further. This small step improves browning more than any extra butter.
Read technique detail from seafood cooking guides if you want to compare doneness cues across fish and shellfish.
Common Mistakes to Avoid
Skipping the dry step leads to pale, rubbery scallops because surface moisture steams the protein. Always pat dry and rest them before they hit the heat.
Moving the scallops too early breaks the forming crust and leaves them stuck. Set them down and wait for the timer before the first flip.
Overcrowding drops the pan temperature and causes uneven cooking. Cook in two batches if your skillet is smaller than 10 inches.
Adding lemon juice over high heat can make the sauce bitter and split the butter. Pull the pan off the burner before deglazing.
Serving Suggestions
Plate the scallops over swordfish with olives style greens for a seafood-forward dinner. A side of steamed asparagus or a light cucumber salad keeps the plate clean.
For a warmer meal, set them on gravy rice with a squeeze of lemon. The butter sauce soaks into the grains and balances the seafood sweetness.
A glass of dry white wine or a non-alcoholic toddy works as a cozy contrast to the browned butter. Keep portions small since scallops are rich per bite.
Storage and Reheating
Cooked scallops keep in an airtight container in the fridge for up to 2 days because of the seafood and butter sauce. Cool them within 2 hours of cooking to stay food safe.
Reheat gently in a nonstick pan over low heat for about 2 minutes per side until just warmed; avoid the microwave, which toughens them. The internal temperature should reach 145°F if reheated.
Freezing is not recommended; the delicate texture turns watery after thaw. Make only what you’ll eat within the two-day window for the best result.
Recipe Variations
Garlic Butter Version
Add 1 minced garlic clove to the butter during the second side. Cook it 30 seconds so it softens without burning, then spoon over the scallops. The flavor turns rounder and more aromatic than the plain lemon finish.
Bacon-Wrapped Option
Wrap each dried scallop in half a slice of thin bacon and secure with a pick before searing. Expect a longer cook of about 3 minutes per side and a smoky, salty crust that pairs with the sweet center.
Caper Lemon Style
Stir 1 teaspoon of drained capers into the butter after flipping for a briny pop. This echoes olive caper flavors and cuts the richness with salty brightness.
Spiced Citrus Twist
Replace lemon with orange juice and add a pinch of smoked paprika to the salt. The scallops take on a warm, sweet-smoke note that suits cold pasta salad on the side.

Seared Scallops
Description
Dry sea scallops seared in butter and oil build a deep golden crust with a sweet, barely opaque center. A bright finish of lemon and parsley keeps each bite clean and savory.
Ingredients
Instructions
-
Dry and rest scallops
Place the scallops on a paper towel and pat the tops and sides very dry with more towels. Let them sit uncovered at room temperature for 10 minutes while you heat the pan so the surface dries further and browns better.
-
Preheat the skillet
Set a 10-inch stainless or cast-iron skillet on medium-high heat and add the oil. Wait until the oil shimmers and a drop of water dances, about 1 minute, showing the pan is fully preheated before the scallops go in.
-
Season the scallops
Season scallops with 1/2 teaspoon fine sea salt and 1/4 teaspoon black pepper on both sides. Coating the surface now helps draw out a better crust during the sear.
-
Sear first side
Lay them in the pan without touching and never crowd the pan, leaving space between each. Leave them undisturbed for 2 minutes until the bottoms are deep golden and release easily when lifted with a thin spatula.
-
Add butter and flip
Add the 1 tablespoon butter to the side of the pan. Once it foams, flip each scallop and cook the second side for 90 seconds until golden and crispy with a sweet, barely opaque center.
-
Rest on warm plate
Transfer scallops to a warm plate so they hold heat while you make the sauce. The seafood should reach a safe internal temperature of 63°C / 145°F for fish and shellfish.
-
Make lemon butter sauce
Pull the pan off the burner and pour 1 tablespoon lemon juice into it off heat, stirring with the browned butter. This keeps the sauce from turning bitter or splitting the butter.
-
Finish and serve
Spoon the lemon butter over the scallops and top with 1 tablespoon chopped fresh parsley. Serve immediately while the crust is crisp and the center is just set.
Nutrition Facts
Servings 2
- Amount Per Serving
- Calories 220kcal
- % Daily Value *
- Total Fat 11g17%
- Saturated Fat 4g20%
- Cholesterol 55mg19%
- Sodium 480mg20%
- Total Carbohydrate 4g2%
- Sugars 1g
- Protein 24g48%
* Percent Daily Values are based on a 2,000 calorie diet. Your daily value may be higher or lower depending on your calorie needs.
Note
- Storage: Keep cooked scallops in an airtight container in the fridge for up to 2 days; cool within 2 hours of cooking to stay food safe.
- Reheating: Warm gently in a nonstick pan over low heat for about 2 minutes per side until they reach 63°C / 145°F; avoid the microwave which toughens them.
- Pro tip: Buy dry-packed scallops and rest them uncovered on a rack in the fridge for 30 minutes to dry the surface further for better browning.
- Serving idea: Plate over swordfish with olives style greens for a seafood-forward dinner.
