
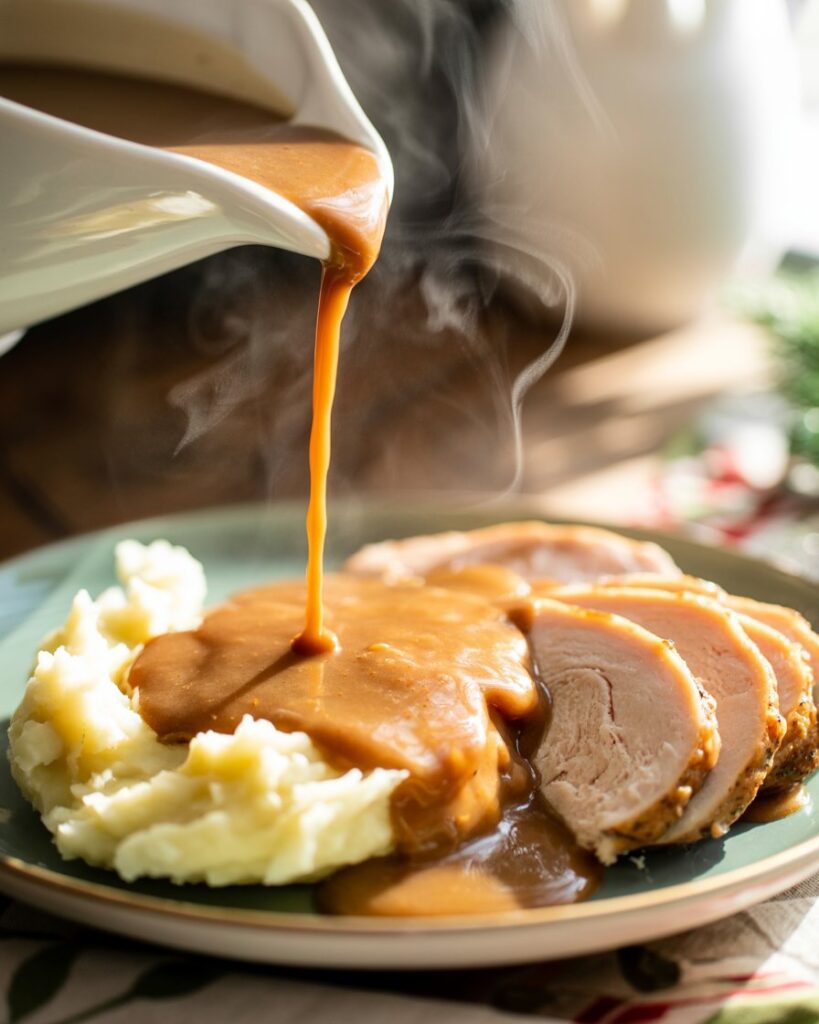
No holiday feast, Sunday roast, or even a simple weeknight meal featuring turkey is truly complete without a rich, savory, and perfectly smooth gravy. While it might seem intimidating, making homemade turkey gravy is surprisingly easy, especially when you have those delicious pan drippings from your roasted turkey. This recipe guides you through creating a lump-free, flavorful gravy that will elevate any dish it touches. Forget the packets and jars; once you taste this homemade version, you’ll never go back. Get ready to drizzle perfection over your mashed potatoes, stuffing, and, of course, your succulent turkey!
Why You’ll Love This Easy Turkey Gravy
You’ll adore this Easy Turkey Gravy recipe because it demystifies the process of making a truly delicious gravy from scratch. It’s incredibly flavorful, thanks to the rich pan drippings, and its smooth, velvety texture is simply irresistible. This recipe is designed to be straightforward, ensuring even novice cooks can achieve a restaurant-quality gravy without stress. It’s the perfect accompaniment to any turkey dish, adding moisture and a burst of savory goodness that ties the entire meal together.
What Makes This Recipe Special
What makes this Easy Turkey Gravy truly special is its reliance on the natural flavors developed during the turkey roasting process. The pan drippings, filled with caramelized bits and rendered fat, form the foundation of an incredibly rich and complex gravy. By building a roux with flour and these drippings, then slowly whisking in broth, you create a velvety texture and deep flavor that store-bought gravies simply can’t replicate. It’s a testament to how simple, quality ingredients can create something extraordinary.


Ingredients You’ll Need

To create this essential Easy Turkey Gravy, you’ll need these simple ingredients:
- Turkey Pan Drippings: From your roasted turkey. The flavorful base.
- All-Purpose Flour: 1/4 cup. For creating the roux and thickening the gravy.
- Chicken or Turkey Broth: 2-3 cups, low sodium. For thinning and adding flavor.
- Salt and Black Pepper: To taste. Essential for seasoning.
- Fresh Herbs: 1 tbsp chopped (e.g., thyme, sage, rosemary), optional. For added aroma and flavor.
Pro-Tips for Success

- Deglaze the Pan: After removing the turkey, add a splash of broth or water to the roasting pan and scrape up all the browned bits (fond) from the bottom. This is where a lot of flavor resides.
- Separate Fat from Drippings: Use a fat separator or simply spoon off most of the fat from the pan drippings, leaving about 1/4 cup of fat for the roux. Too much fat can make the gravy greasy.
- Whisk Constantly: When making the roux and adding the broth, whisk continuously to prevent lumps and ensure a smooth consistency.
- Adjust Consistency: If the gravy is too thick, add more broth, a tablespoon at a time, until desired consistency is reached. If too thin, simmer gently to reduce, or make a slurry of cornstarch and water to thicken.
- Taste and Adjust Seasoning: Gravy often needs a final seasoning adjustment. Taste it before serving and add more salt, pepper, or even a dash of soy sauce or Worcestershire for umami.
Common Mistakes to Avoid
- Not Separating Fat: Leaving too much fat in the drippings can result in a greasy gravy.
- Not Whisking Enough: This is the primary cause of lumpy gravy. Whisk, whisk, whisk!
- Adding Cold Broth: Adding cold broth to a hot roux can cause lumps. Warm your broth slightly before adding it.
- Over-Thickening: Gravy can become too thick as it cools. Aim for a slightly thinner consistency than you desire, as it will thicken upon standing.
- Forgetting to Season: Gravy needs proper seasoning to shine. Don’t forget to taste and adjust before serving.
Flavor Variations
- Mushroom Gravy: Sauté finely chopped mushrooms with the flour before adding broth for an earthy flavor.
- Wine Infusion: Deglaze the pan with 1/4 cup of dry white or red wine before adding broth for added depth.
- Herbaceous Gravy: Infuse the broth with fresh sprigs of rosemary, thyme, or sage before adding to the roux, then strain.
- Creamy Gravy: Stir in a tablespoon or two of heavy cream at the very end for an extra rich and creamy texture.
- Onion Gravy: Sauté finely diced onions until caramelized before making the roux for a sweeter, deeper flavor.
What to Serve With Easy Turkey Gravy

Easy Turkey Gravy is the quintessential accompaniment to roasted turkey, mashed potatoes, stuffing, and even roasted vegetables. It’s also delicious over chicken, pork, or even a simple plate of biscuits. It’s a versatile sauce that enhances almost any savory dish, making it a staple for holiday meals and comforting dinners alike.
Storage and Reheating
Leftover turkey gravy can be stored in an airtight container in the refrigerator for up to 3-4 days. To reheat, gently warm the gravy in a saucepan over medium-low heat, whisking constantly. If it’s too thick, add a splash of chicken or turkey broth until it reaches your desired consistency. If it’s too thin, you can make a cornstarch slurry (1 tsp cornstarch mixed with 1 tbsp cold water) and whisk it into the simmering gravy until thickened.
View Full Recipe
Easy Turkey Gravy
Description
Learn how to make the best Easy Turkey Gravy from scratch using pan drippings. This simple recipe guarantees a rich, lump-free, and incredibly flavorful gravy every time.
Ingredients
Instructions
-
Step 1 (0-2 min): Prepare Drippings
After removing your roasted turkey from the pan, carefully pour the pan drippings into a fat separator or a heatproof bowl. Allow the fat to separate and rise to the top. Skim off and reserve about 1/4 cup of the fat. Discard any excess fat. Reserve the remaining liquid (broth/juices) from the separator.
-
Step 2 (2-5 min): Make the Roux
Place the roasting pan (or a saucepan if you prefer) over medium heat. Add the reserved 1/4 cup of turkey fat to the pan. Sprinkle in the all-purpose flour and whisk constantly for 2-3 minutes, creating a smooth paste (roux). Cook until the roux is lightly golden brown, which helps eliminate the raw flour taste.
-
Step 3 (5-10 min): Whisk in Broth
Gradually whisk in the warmed chicken or turkey broth, a little at a time, ensuring each addition is fully incorporated before adding more. Continue whisking until the gravy is smooth and lump-free. Stir in any reserved turkey juices from the fat separator.
-
Step 4 (10-15 min): Simmer and Season
Bring the gravy to a gentle simmer, whisking occasionally, and cook for 5-10 minutes, or until it thickens to your desired consistency. If using, stir in fresh chopped herbs. Taste and season with salt and freshly ground black pepper as needed. Serve hot.
Nutrition Facts
Servings 8
- Amount Per Serving
- Calories 80kcal
- % Daily Value *
- Total Fat 5g8%
- Saturated Fat 2g10%
- Cholesterol 10mg4%
- Sodium 250mg11%
- Total Carbohydrate 5g2%
- Protein 2g4%
* Percent Daily Values are based on a 2,000 calorie diet. Your daily value may be higher or lower depending on your calorie needs.
Note
- Don't Waste the Fond: Scrape up all the browned bits from the roasting pan; they are packed with flavor.
- Whisk Away Lumps: Constant whisking is your best friend for a smooth, velvety gravy.
- Taste and Adjust: Always taste your gravy before serving and adjust seasonings to perfection.