

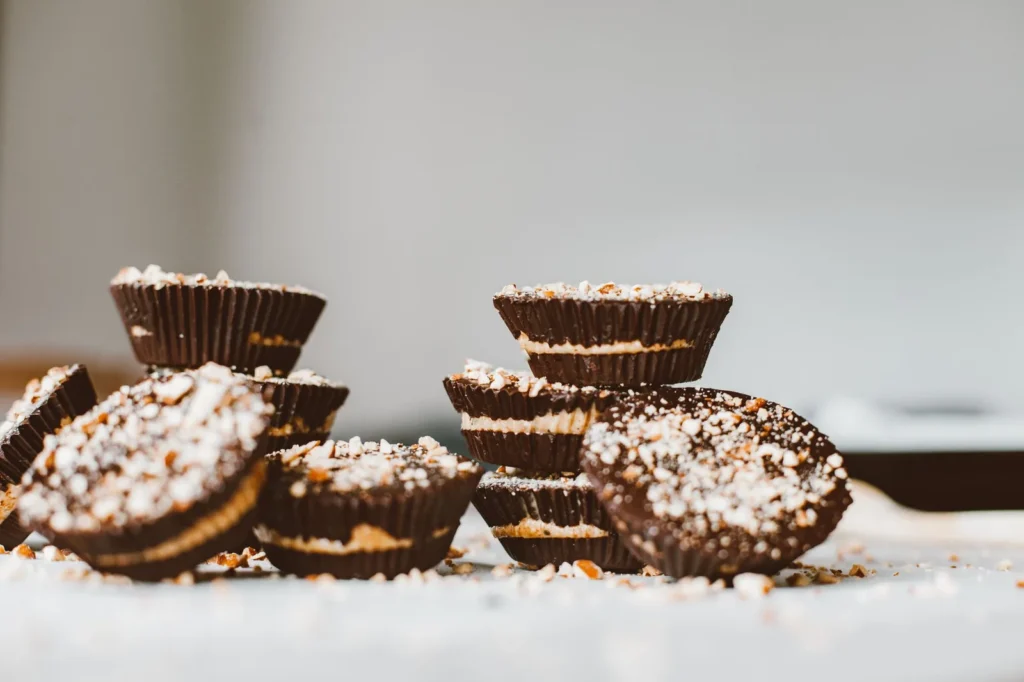
A chocolate sunflower butter cups recipe gives you a nut-free twist on the classic peanut butter cup, using roasted sunflower seed spread for a creamy, lightly earthy filling. The candy shell sets firm in the fridge while the center stays soft, so each bite has a clean snap followed by a smooth melt. You get a make-ahead dessert that travels well and fits lunchboxes without triggering nut allergies.
This version uses just a few pantry ingredients and no oven, which keeps the process short and the cleanup minimal. The ratio of chocolate to filling leans toward a thicker center than store brands, so the sunflower flavor actually comes through. If you already keep sunflower butter on hand, this is one of the fastest ways to turn it into something special. If you enjoyed this, our garlic butter baked is worth trying next. Making this chocolate sunflower butter cups at home is surprisingly straightforward once you know the key steps.
Why You’ll Love These Chocolate Sunflower Butter Cups
- Nut-free filling works for school lunches and allergy-safe snack trays.
- No-bake method means no oven time and almost no dishes.
- Dark chocolate shell gives a firm snap and bitter contrast to the sweet center.
- Makes 12 standard cups that freeze cleanly for up to 2 months.
- Easy to scale up using a mini muffin tin and a single melting bowl.
Ingredients You’ll Need
- 1 cup dark chocolate chips (60 to 70 percent cacao), for a firm shell.
- 2 tablespoons coconut oil, divided, to thin the chocolate for molding.
- 3/4 cup sunflower seed butter, unsweetened and stir-able at room temperature.
- 2 tablespoons maple syrup, to lightly sweeten the filling.
- 1/4 teaspoon fine sea salt, to balance the chocolate bitterness.
- 1/2 teaspoon vanilla extract, for roundness in the filling flavor.
- 2 tablespoons powdered sugar, to firm the sunflower center slightly.
Ingredient Substitutions
Dark chocolate chips: Replace with an equal weight of milk chocolate chips if you prefer a sweeter, softer shell. Milk chocolate contains more cocoa butter and sugar, so the cups will melt faster at room temperature and need longer fridge time to set. Expect a lighter color and a less bitter edge that lets the sunflower taste read stronger. The chocolate sunflower butter cups works well for weeknight cooking when time is limited.








Sunflower seed butter: Swap with an equal amount of pumpkin seed butter for a deeper green-toned filling and a more savory note. Pumpkin seed butter is usually looser, so add 1 extra tablespoon of powdered sugar to keep the center from slumping. The cups will taste grassier and less sweet than the original. Storing leftover chocolate sunflower butter cups correctly keeps it tasting good for days.
Maple syrup: Use an equal volume of honey if you don’t need a vegan cup. Honey binds the filling a touch tighter and adds a floral note that pairs well with dark chocolate. The center will stay slightly softer, so chill the tray for 20 minutes longer before unmolding. For the best results with this chocolate sunflower butter cups, read through all the steps before starting.
Coconut oil: Substitute with refined avocado oil at a 1-to-1 ratio for a neutral flavor and similar thinning power. Avocado oil has a higher smoke point but that doesn’t matter here since there’s no heating past gentle melting. The shell will look a shade glossier and snap a little less crisp.
Powdered sugar: Replace with an equal amount of tapioca starch if you want a starch-thickened center without added sugar. Tapioca sets the filling more firmly when cold but can turn slightly gummy if the cups warm up. Use this swap when watching sugar but still need structure. For another easy option, check out our garlic butter salmon.
Step-by-Step Instructions
- Line a 12-cup mini muffin tin with paper liners and set it on a flat tray for easy moving.
- Combine 1 cup dark chocolate chips and 1 tablespoon coconut oil in a heatproof bowl over medium-low heat, stirring until fully melted and glossy with no lumps.
- Spoon 1 teaspoon of melted chocolate into each liner and use the back of the spoon to pull it up the sides until the base is covered.
- Place the tray in the fridge for 10 minutes so the shells turn firm and matte rather than sticky.
- Stir 3/4 cup sunflower seed butter, 2 tablespoons maple syrup, 1/4 teaspoon salt, 1/2 teaspoon vanilla, 2 tablespoons powdered sugar, and the remaining 1 tablespoon coconut oil in a bowl until smooth and paste-like.
- Drop about 1 tablespoon of filling into each chilled shell, pressing gently so it sits below the rim with a small chocolate border showing.
- Reheat the leftover melted chocolate if needed over medium-low heat until pourable, then spoon 1 teaspoon over each cup to seal the top.
- Tap the tray on the counter twice to level the caps, then refrigerate for 25–30 minutes until the chocolate is hard and glossy.
- Peel the liners and serve, or pack the cups into a lidded container with parchment between layers.
Pro Tips
Warm your sunflower butter to room temperature before mixing so it blends without clumps and spreads cleanly into the shells. Cold nut-free butter seizes when it hits the chocolate and leaves a grainy layer you can’t smooth out.
Use a double boiler technique if your bowl is thin, since direct heat can scorch chocolate in under a minute and turn it dull and thick.
Keep the filled tray level in the fridge; a tilted shelf lets the soft center drift to one side and breaks the even chocolate border. Mark the tray spot before you slide it in.
Portion the filling with a small cookie scoop so every cup gets the same height and the top chocolate layer seals with equal thickness. Uneven fills crack more when cold.
Common Mistakes to Avoid
Skipping the first chill before adding filling lets the warm sunflower mix melt the thin shell and pool at the base. Always wait until the liner cups are firm and matte before the next step.
Pouring chocolate that’s too hot over the filling can loosen the center and create a muddy layer instead of a clean cap. Let the melt cool to warm not hot before sealing.
Using runny sunflower butter without the powdered sugar makes the middle ooze out when bitten at room temperature. Thicken it as written or the cup won’t hold its shape. You might also like our garlic butter baked.
Serving Suggestions
Plate the cups on a cold slate board with a few walnut sauce dipped crackers if you want a savory contrast on a dessert spread. The bitter chocolate next to a salty spread reads as a small tasting board.
For a lunchbox add-on, pack two cups with apple slices and a cheese stick so the fat and protein slow the sugar hit. They hold shape for about an hour unrefrigerated in cool weather.
Slice a cup in half and set it on butter beans puree as a plated sweet bite after a light dinner. The creamy base makes the chocolate snap stand out.
Storage and Reheating
Keep finished cups in an airtight container in the fridge for up to 3 weeks since the filling has no dairy or egg to spoil. Layer them with parchment so the shells don’t stick and crack.
Freeze the cups for up to 2 months in a hard container; thaw in the fridge for 20 minutes before eating so condensation stays off the chocolate. Don’t microwave them or the shell will bloom and soften.
Don’t leave the tray out for more than 2 hours total, because coconut oil in the shell softens fast above 70°F and the cups lose their snap. Put leftovers away as soon as the plate clears.
Recipe Variations
Sea Salt Top
Sprinkle 2 to 3 flakes of flaky salt on the warm top chocolate before the final chill for a crunchy saline pop. The salt cuts the sweetness and makes the cacao taste cleaner. Use this version when serving after dinner instead of packing for kids.
White Chocolate Shell
Replace the dark chips with white chocolate and add 1 teaspoon lemon zest to the sunflower filling for a brighter cup. White chocolate sets softer, so extend the fridge time by 10 minutes and keep the cups cold until serving. The look is pale gold with a sweet vanilla edge.
Espresso Center
Stir 1/2 teaspoon instant espresso powder into the filling mix to deepen the roast note against the chocolate. The cups taste like a muted mocha and pair well with lemon butter fish courses as a bitter close. Don’t use more than 1 teaspoon or the center turns chalky.
Crunchy Seed Mix
Fold 2 tablespoons toasted sunflower seeds into the filling for a brittle-like bite inside the cup. The seeds add crunch and a toasted flavor that plain butter lacks. Press the mix down firmly so the top chocolate seals without gaps.

Chocolate Sunflower Butter Cups
Description
A nut-free twist on the classic peanut butter cup using roasted sunflower seed spread for a creamy, earthy filling inside a dark chocolate shell. These no-bake cups set firm in the fridge with a soft center and are perfect for lunchboxes and allergy-safe snacks.
Ingredients
Instructions
-
Line muffin tin
Line a 12-cup mini muffin tin with paper liners and set it on a flat tray for easy moving. This keeps the cups stable and makes transferring to the fridge simple without spills.
-
Melt chocolate
Combine 1 cup dark chocolate chips and 1 tablespoon coconut oil in a heatproof bowl over medium-low heat, stirring until fully melted and glossy with no lumps. Use a double boiler if your bowl is thin, since direct heat can scorch chocolate in under a minute and turn it dull and thick.
-
Form shells
Spoon 1 teaspoon of melted chocolate into each liner and use the back of the spoon to pull it up the sides until the base is covered. The chocolate should coat the bottom and lower sides evenly to form a cup shape that will hold the filling.
-
Chill shells
Place the tray in the fridge for 10 minutes so the shells turn firm and matte rather than sticky. Wait until the liner cups are firm and no longer tacky before adding the filling, or the warm mix will melt the thin shell and pool at the base.
-
Mix filling
Stir 3/4 cup sunflower seed butter, 2 tablespoons maple syrup, 1/4 teaspoon salt, 1/2 teaspoon vanilla, 2 tablespoons powdered sugar, and the remaining 1 tablespoon coconut oil in a bowl until smooth and paste-like. Warm your sunflower butter to room temperature before mixing so it blends without clumps and spreads cleanly into the shells.
-
Fill shells
Drop about 1 tablespoon of filling into each chilled shell, pressing gently so it sits below the rim with a small chocolate border showing. Use a small cookie scoop to portion the filling so every cup gets the same height and the top chocolate layer seals with equal thickness.
-
Seal tops
Reheat the leftover melted chocolate if needed over medium-low heat until pourable, then spoon 1 teaspoon over each cup to seal the top. Let the melt cool to warm not hot before sealing, as pouring chocolate that's too hot can loosen the center and create a muddy layer instead of a clean cap.
-
Chill and serve
Tap the tray on the counter twice to level the caps, then refrigerate for 25–30 minutes until the chocolate is hard and glossy. Peel the liners and serve, or pack the cups into a lidded container with parchment between layers for storage.
Nutrition Facts
Servings 12
- Amount Per Serving
- Calories 180kcal
- % Daily Value *
- Total Fat 13g20%
- Saturated Fat 7g35%
- Sodium 90mg4%
- Total Carbohydrate 14g5%
- Dietary Fiber 2g8%
- Sugars 9g
- Protein 3g6%
* Percent Daily Values are based on a 2,000 calorie diet. Your daily value may be higher or lower depending on your calorie needs.
Note
- Storage: Keep finished cups in an airtight container in the fridge for up to 3 weeks, layering with parchment so shells don't stick and crack.
- Make ahead: The cups freeze for up to 2 months in a hard container; thaw in the fridge 20 minutes before serving.
- Pro tip: Warm sunflower butter to room temperature before mixing to avoid a grainy layer when it hits the chocolate; for another easy treat try our chocolate bun recipe.
- Food safety: Don't leave the tray out more than 2 hours total since coconut oil softens fast above 70°F and the cups lose their snap.
