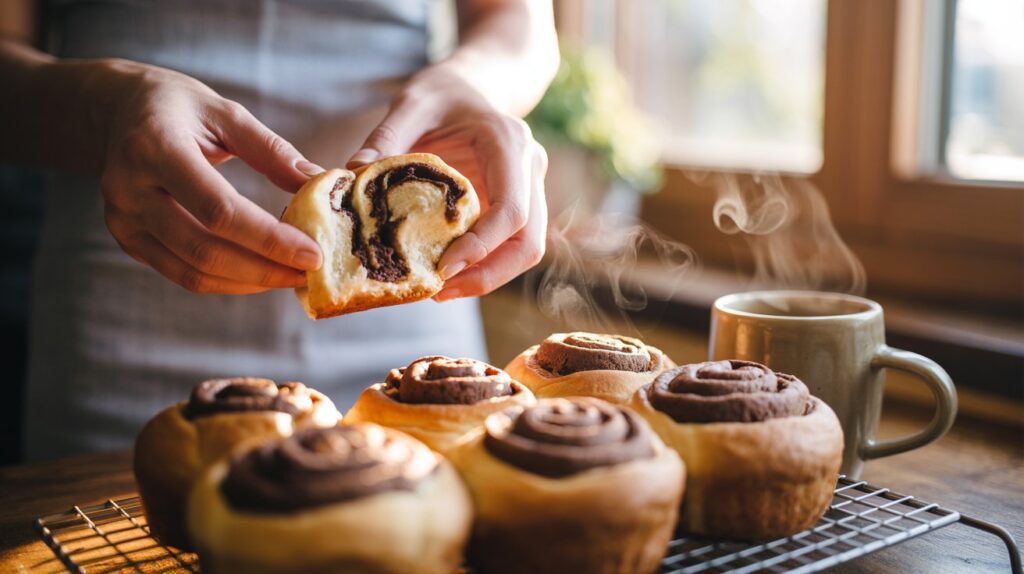
These soft, pillowy buns with a rich chocolate swirl filling are the kind of thing that makes your whole house smell incredible. This easy chocolate bun recipe is designed for home bakers of any level — no stand mixer required, no complicated techniques, just a reliable dough that comes together beautifully and a chocolate filling that melts into every layer. Whether you're making them for a weekend breakfast, a school snack, or just because you want something warm and chocolatey, this recipe delivers every time.
Why You'll Love This Easy Chocolate Bun Recipe
Genuinely beginner-friendly — The dough is forgiving and the steps are clear. If you've never made yeasted buns before, this is the perfect place to start.
Incredibly soft texture — A touch of butter and egg in the dough keeps these buns tender for days, not just fresh out of the oven.
Rich chocolate filling — Not too sweet, not too bitter. Just the right amount of cocoa and sugar in every bite.
No stand mixer needed — You can knead this dough entirely by hand in about 10 minutes.
Crowd-pleaser — Kids and adults alike go back for seconds. Great for lunchboxes, brunches, and bake sales.
What Makes This Recipe Special
Most chocolate bun recipes either produce a dense, dry result or require professional-level skills. This one uses a slightly enriched dough — meaning it has butter and egg added — which gives the buns a soft, brioche-like crumb without the complexity of actual brioche. The dough is easy to work with and very forgiving.
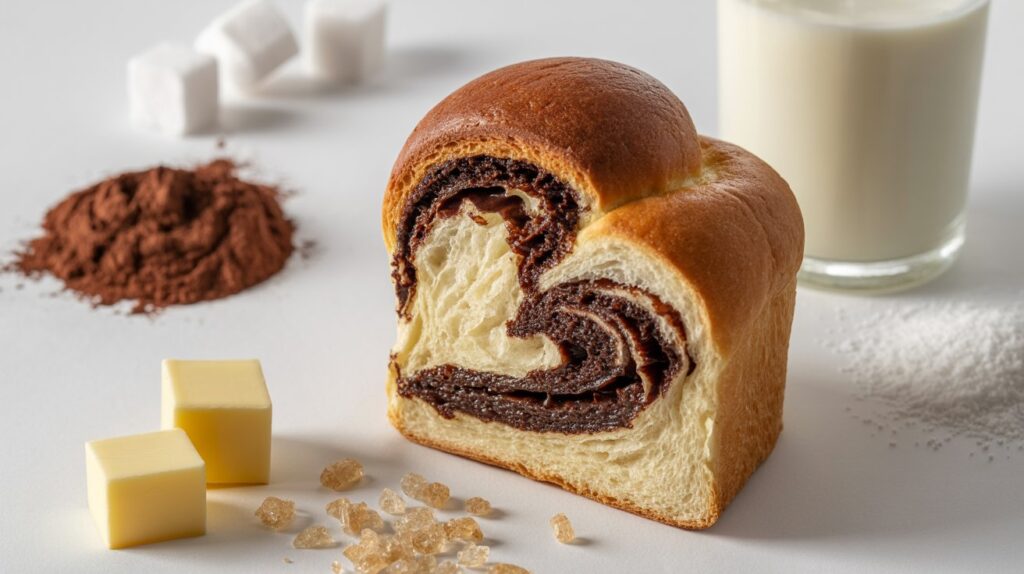
The filling uses melted butter, cocoa powder, and brown sugar combined into a smooth paste that spreads easily and stays put during rolling. No dry cocoa falling out, no mess. Just clean, even chocolate swirls in every bun.
Ingredients You'll Need
Everything in this recipe comes from a standard pantry and fridge. No specialty ingredients, no trips to a baking supply store. Just everyday items that combine into something really special.
All-purpose flour — The backbone of the dough. Measure by spooning into the cup and leveling off — packed flour makes the dough too stiff.
Instant yeast (fast-action yeast) — Goes straight into the flour with no proofing step needed. Active dry yeast works too but needs to be activated in warm milk first.
Whole milk — Warmed to about 38°C (100°F). Too hot kills the yeast; too cold and it won't activate. Warm on the wrist is just right.
Caster sugar (superfine sugar) — Feeds the yeast and sweetens the dough slightly. Regular granulated sugar works fine too.
Unsalted butter — Softened for the dough, melted for the filling. Butter is what makes these buns rich and tender.
One egg — Adds structure and richness to the dough.
Salt — Balances the sweetness and strengthens the dough. Don't skip it.
Unsweetened cocoa powder — Dutch-process gives a deeper, smoother chocolate flavor. Natural cocoa works too but is slightly more acidic.
Brown sugar — For the filling. The molasses notes complement the cocoa perfectly.
Vanilla extract — Just a touch in the filling lifts the whole flavor.
Pro-Tips for Success
Check your yeast before you start. If your yeast is old, the buns won't rise. To test it, mix a teaspoon of yeast with a teaspoon of sugar in 60ml of warm water. If it's foamy after 10 minutes, it's alive and good to go. If nothing happens, buy fresh yeast.
Don't add too much flour. The dough will feel slightly sticky at first — that's fine and correct. Resist the urge to keep adding flour. A stickier dough makes softer buns. Only add more flour if the dough is so wet it won't hold any shape at all.
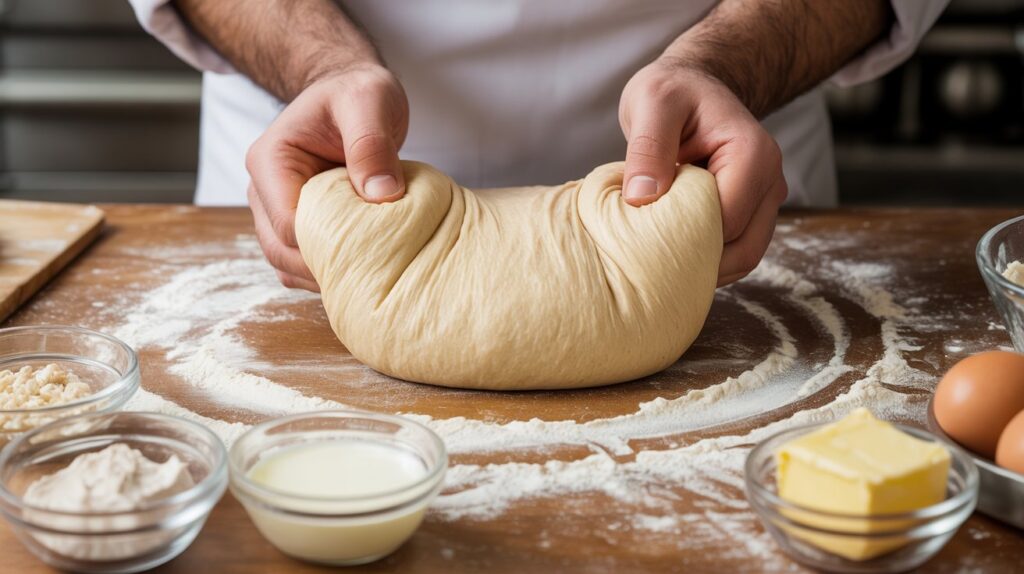
Knead until smooth and elastic. Properly kneaded dough should pass the windowpane test — stretch a small piece between your fingers and it should be thin enough to see light through without tearing. This takes about 10 minutes by hand.
Let it rise in a warm spot. Yeast works best at 24–28°C. Good options: inside an oven with just the light on, on top of the fridge, or near a warm stovetop. Cold kitchens slow the rise dramatically.
Roll the dough evenly. An uneven rectangle means uneven buns. Use a ruler if you need to — aim for a rectangle roughly 35x25cm and about 5mm thick.
Use a sharp knife or dental floss to cut. A dull knife drags and squishes the rolls. Unflavored dental floss slid under the roll and crossed over the top gives you perfect, clean cuts every time.
Common Mistakes to Avoid
Killing the yeast with hot milk. Milk above 43°C (110°F) will kill the yeast and your dough simply won't rise. Always test the temperature — it should feel comfortably warm, like bath water, not hot.
Under-proofing the buns. After shaping, the buns need a second rise before baking. If you bake them too soon, they'll be dense and tough. They should look noticeably puffier and feel light when you gently press them — the indent should spring back slowly.
Overbaking. These buns continue cooking slightly after they come out of the oven. Pull them when the tops are golden and the internal temperature reads around 88–93°C (190–200°F). Overbaked buns dry out quickly.
Spreading the filling all the way to the edge. Leave a 1–2cm border on the long edge you'll be rolling toward. This helps the dough seal and prevents the filling from oozing out the ends during baking.
Flavor Variations
Nutella Swirl: Replace the cocoa-butter-sugar filling with a thin, even layer of Nutella. Warm it slightly so it spreads easily without tearing the dough.
Chocolate Chip: After spreading the cocoa filling, scatter a handful of mini chocolate chips across the surface before rolling. Gives you melted pockets of chocolate throughout.
Mocha: Add 1 teaspoon of instant espresso powder to the filling mixture. The coffee deepens and intensifies the chocolate flavor without making the buns taste like coffee.
Orange Chocolate: Add 1 teaspoon of finely grated orange zest to the filling. The citrus cuts through the richness beautifully — a classic combination.
Double Chocolate: Add 2 tablespoons of cocoa powder to the dough itself as well as the filling for a richer, darker bun all the way through.
What to Serve With Easy Chocolate Bun Recipe
These buns are wonderful on their own, but even better alongside:
Whipped cream — Serve warm buns with a dollop of lightly whipped cream for a dessert-worthy treat.
Ice cream — A warm chocolate bun with a scoop of vanilla ice cream is an easy, crowd-pleasing dessert.
Storage and Reheating
Room temperature: Store cooled buns in an airtight container or zip-lock bag at room temperature for up to 3 days. They stay surprisingly soft thanks to the butter and egg in the dough.
Freezing: These buns freeze beautifully. Once completely cooled, wrap individually in plastic wrap and store in a freezer bag for up to 2 months. Thaw at room temperature for 1–2 hours or overnight in the fridge.
Reheating: Warm individual buns in the microwave for 15–20 seconds for that fresh-from-the-oven feel. Alternatively, wrap in foil and reheat in the oven at 160°C for 8–10 minutes. Avoid overheating — it dries them out quickly.
This easy chocolate bun recipe produces soft, pillowy buns filled with a buttery cocoa and brown sugar swirl. Made entirely by hand with everyday ingredients, they're perfect for breakfast, snacks, or whenever a chocolate craving strikes.
Ingredients
3 cups (375g) all-purpose flour, plus extra for dusting
2 1/4 tsp (7g / 1 packet) instant yeast
3/4 cup (180ml) whole milk, warmed to 38°C (100°F)
In a large bowl, whisk together the flour, instant yeast, sugar, and salt. Make a well in the center and add the warmed milk, softened butter, egg, and vanilla extract. Mix with a wooden spoon or your hands until a shaggy dough forms. Turn out onto a lightly floured surface and begin kneading.
2
Step 2 — Knead the Dough (10–20 min)
Knead the dough by pushing it away from you with the heel of your hand, folding it back, rotating a quarter turn, and repeating. Knead for 8–10 minutes until the dough is smooth, elastic, and slightly tacky but not sticky. To test doneness, stretch a small piece between your fingers — it should stretch thin without tearing (windowpane test). If it tears immediately, knead for another 2–3 minutes.
3
Step 3 — First Rise (20–80 min)
Shape the dough into a ball and place it in a lightly oiled bowl. Cover with plastic wrap or a damp kitchen towel. Place in a warm spot (24–28°C) and let it rise for 60 minutes, or until doubled in size. The timing depends on how warm your kitchen is — a cold kitchen may need up to 90 minutes.
4
Step 4 — Make the Chocolate Filling (5 min)
While the dough rises, mix together the melted butter, cocoa powder, brown sugar, and vanilla extract in a small bowl. Stir until fully combined into a smooth, spreadable paste. Set aside at room temperature. If it firms up too much before you need it, give it a quick stir — it should have the consistency of thick peanut butter.
5
Step 5 — Roll and Fill (80–90 min)
Once doubled, punch the dough down gently to release the air. Turn it out onto a lightly floured surface and roll into a rectangle approximately 35x25cm (14x10 inches), about 5mm thick. Spread the chocolate filling evenly over the entire surface, leaving a 2cm (1 inch) border along one of the long edges. Starting from the opposite long edge, roll the dough tightly into a log. Pinch the seam firmly to seal.
6
Step 6 — Cut and Arrange (90–95 min)
Using a sharp knife or unflavored dental floss, cut the log into 10 equal pieces, each about 3.5cm thick. Place the buns cut-side up in a greased 23x33cm (9x13 inch) baking pan, spacing them slightly apart. They will expand and touch during the second rise, which is what creates those soft, pull-apart sides.
7
Step 7 — Second Rise (95–125 min)
Cover the pan loosely with plastic wrap and let the buns rise in a warm spot for 30–40 minutes, until they look noticeably puffier and fill the pan. They should feel light and airy when gently touched, and a finger indent should spring back slowly. Meanwhile, preheat your oven to 180°C (350°F).
8
Step 8 — Egg Wash and Bake (125–145 min)
If using egg wash, lightly brush the tops of the risen buns with the egg and milk mixture — this gives a beautiful golden finish. Bake in the preheated oven for 18–22 minutes until the tops are golden brown. The internal temperature should read 88–93°C (190–200°F). Do not overbake — they dry out quickly past this point.
9
Step 9 — Cool and Serve
Remove from the oven and let the buns cool in the pan for at least 10 minutes before serving. If glazing, drizzle with a simple icing (powdered sugar + milk) while still warm. Serve warm for the best texture and flavor. Pull apart and enjoy.
Nutrition Facts
Servings 10
Amount Per Serving
Calories285kcal
% Daily Value *
Total Fat9g14%
Saturated Fat5g25%
Cholesterol38mg13%
Sodium180mg8%
Total Carbohydrate45g15%
Dietary Fiber2g8%
Sugars14g
Protein6g12%
* Percent Daily Values are based on a 2,000 calorie diet. Your daily value may be higher or lower depending on your calorie needs.
Note
The Windowpane Test is Your Best Friend: Don't rely on time alone to know when your dough is properly kneaded. Stretch a small piece between your thumbs and forefingers — if it forms a thin, translucent membrane without tearing, your gluten is developed and the dough is ready. If it tears right away, keep kneading for another 2–3 minutes and test again.
Dental Floss for Perfect Cuts: Slide a piece of unflavored dental floss under the dough log, cross the ends over the top, and pull in opposite directions. This cuts cleanly through the dough without squishing the roll — giving you picture-perfect swirls every time. A sharp serrated knife is the second-best option.
Bake from Cold for Extra Convenience: You can prepare and shape the buns the night before, place them in the pan, cover tightly, and refrigerate overnight. In the morning, take them out 30–45 minutes before baking to finish their second rise at room temperature. Then bake as directed. Fresh buns with almost no morning effort.
Keywords:
easy chocolate bun recipe, chocolate buns, chocolate swirl buns, homemade chocolate buns, soft chocolate buns, chocolate bread rolls, cocoa buns, easy bun recipe, chocolate filled buns, beginner bun recipe
Pin this recipe to share with your friends and followers.
Anna
Food and Lifestyle Blogger
Hi, I’m Anna — a wellness enthusiast, recipe creator, and founder of Cook Recipe. I love making healthy, easy, and feel-good meals that inspire others to live happier, more balanced lives. When I’m not in the kitchen, you’ll find me exploring new places or flowing through a yoga session! 🌿